Disclaimer Regarding Use of SWGDE Documents
SWGDE documents are developed by a consensus process that involves the best efforts of relevant subject matter experts, organizations, and input from other stakeholders to publish suggested best practices, practical guidance, technical positions, and educational information in the discipline of digital and multimedia forensics and related fields. No warranty or other representation as to SWGDE work product is made or intended.
SWGDE requests notification by e-mail before or contemporaneous to the introduction of this document, or any portion thereof, as a marked exhibit offered for or moved into evidence in such proceeding. The notification should include: 1) The formal name of the proceeding, including docket number or similar identifier; 2) the name and location of the body conducting the hearing or proceeding; and 3) the name, mailing address (if available) and contact information of the party offering or moving the document into evidence. Subsequent to the use of this document in the proceeding please notify SWGDE as to the outcome of the matter. Notifications should be submitted via the SWGDE Notice of Use/Redistribution Form or sent to secretary@swgde.org.
From time to time, SWGDE documents may be revised, updated, or sunsetted. Readers are advised to verify on the SWGDE website (https://v8g6l3d3148.c.updraftclone.com) they are utilizing the current version of this document. Prior versions of SWGDE documents are archived and available on the SWGDE website.
Redistribution Policy
SWGDE grants permission for redistribution and use of all publicly posted documents created by SWGDE, provided that the following conditions are met:
- Redistribution of documents or parts of documents must retain this SWGDE cover page containing the Disclaimer Regarding Use.
- Neither the name of SWGDE nor the names of contributors may be used to endorse or promote products derived from its documents.
- Any reference or quote from a SWGDE document must include the version number (or creation date) of the document and also indicate if the document is in a draft status.
Requests for Modification
SWGDE encourages stakeholder participation in the preparation of documents. Suggestions for modifications are welcome and must be submitted via the SWGDE Request for Modification Form or forwarded to the Secretary in writing at secretary@swgde.org. The following information is required as a part of any suggested modification:
- Submitter’s name
- Affiliation (agency/organization)
- Address
- Telephone number and email address
- SWGDE Document title and version number
- Change from (note document section number)
- Change to (provide suggested text where appropriate; comments not including suggested text will not be considered)
- Basis for suggested modification
Intellectual Property
Unauthorized use of the SWGDE logo or documents without written permission from SWGDE is a violation of our intellectual property rights.
Individuals may not misstate and/or over represent duties and responsibilities of SWGDE work. This includes claiming oneself as a contributing member without actively participating in SWGDE meetings; claiming oneself as an officer of SWGDE without serving as such; claiming sole authorship of a document; use the SWGDE logo on any material and/or curriculum vitae.
Any mention of specific products within SWGDE documents is for informational purposes only; it does not imply a recommendation or endorsement by SWGDE.
1. Purpose
The purpose of this document is to describe the best practices for the forensic acquisition of digital evidence from Apple macOS-based (“Mac”) computers, including the Intel based processors and the new Apple Silicon processors (i.e., “M1”, “M2”). Early Macs (i.e. pre-2006) with the PowerPC processors are beyond the scope of this document. This document outlines the procedures to best maintain the integrity of digital evidence and enumerate certain risks and concepts examiners should understand when handling Intel and Apple Silicon based Macs.
2. Scope
This document provides basic information on acquisitions of data from Apple computers, specifically MacBook Pro, MacBook Air, Mac Mini, Mac Studio, iMac, and Mac Pro. The intended audience includes those personnel qualified to acquire and handle digital evidence. For guidance on recommended training and qualifications, see SWGDE/SWGIT Guidelines & Recommendations for Training in Digital & Multimedia Evidence [1].
For the purposes of this document, the term “examiner” refers to those who conduct collections, acquisitions, or analysis. Also for the purposes of this document, the term “collection” refers to any operations involved in the gathering, seizing, etc. of items to be examined or analyzed.
3. Limitations
This document is not intended to be a training manual, nor to replace organizational policy, or standard operating procedures, nor should it be construed as legal advice. This document is not all-inclusive and does not contain information regarding specific commercial forensic products, and it may not be applicable in all circumstances. When warranted, an examiner may deviate from these best practices and still obtain reliable, defensible results. If examiners encounter situations warranting deviation from best practices, they should thoroughly document the specifics of the situation and actions taken.
These best practices may not apply in incident response or complex live acquisition scenarios. For guidance with the capture of live systems, see SWGDE Capture of Live Systems [2].
4. Preparation
The needs and aims of an investigation should drive the digital forensic process. Preparing for the acquisition of digital evidence includes clear communication between the examiner and investigative team. This communication includes the details of the investigation, the nature and scope of the potential evidence to be acquired, and unique constraints that may impact acquisition. Examiners should consult appropriate legal counsel if clarification on legal authority is needed.
Prior to performing digital acquisition or collection, considerations should be made for the collection and preservation of traditional forensic evidence (e.g., latent fingerprints, DNA, spatter evidence on the surface of devices, etc.). Precautions should be taken to prevent exposure
to evidence that may be contaminated with dangerous substances or hazardous materials.
5. Location and Environment
Acquisitions should be conducted in a safe and controlled environment with stable electrical power. Access to the work area should be limited to authorized personnel. Acquisitions can be performed onsite or offsite. Examiners should take extra precautions while performing on-site acquisitions and identify potential environmental conditions that may be out of their control (e.g., power). If unmitigable external factors are likely to interrupt or interfere with the acquisition, examiners should consider prioritizing targeted acquisitions of data, in order of importance to the investigation. This maximizes the likelihood of capturing relevant data prior to any failure or interruption.
6. Information Specific to Forensic Collection of Mac/Apple Computers
The forensic imaging methodologies for an Apple system differ significantly from the traditional methods used on Windows-based or other systems. This is primarily due to the cohesive security minded environment Apple has created with its products and limitations on publicly available technical data. As an example, examiners will often first conduct a RAM capture from a Windows-based system. On a Mac however, RAM capture will often induce a kernel panic (a system error) forcing the examiner to restart the computer, potentially losing digital evidence. Additionally, Macs keep a significant amount of metadata for the files that touch their systems. This data is called the Apple Extended Attributes and includes several timestamps and other valuable information macOS uses to track files. For example, there is a specific metadata attribute key called “kMDItemWhereFroms”, which tracks the travel of a document across data transfer technologies like Messages and AirDrop. The reader will find that items and steps listed below may appear out of order when compared to traditional Windows-based methods. This is because Macs are technically different, which requires unique steps and processes to work with them. SWGDE cautions the reader to read this document in its entirety prior to beginning a Mac acquisition.
6.1 Volatile Data Acquisition and Initial Network Concerns
Examiners should consider the need to collect memory and ancillary data such as metadata, encryption keys, log files, schema information, as well as documentation needed to access and understand the data sought in the context of the investigation, see SWGDE Best Practices for Digital Evidence Collection [3]. As noted in the preceding paragraph, conducting a memory acquisition on a Mac may result in a kernel panic, rendering the examination useless if the panic occurs prior to obtaining a full-disk acquisition or the administrator’s password. As Apple has moved towards increased security, they have used that security to protect areas that contain volatile data. Memory is one of those areas Apple has protected. Because of this propensity to panic, Mac memory acquisitions should be held until all other forensic acquisition actions have been taken by the examiner or when memory acquisition software has been preinstalled on the computer.
Due to the always-on nature of Mac computers and their ability to seamlessly connect to other Macs and Apple products, examiners should be aware data located on the target Mac can change anytime a Mac is on or off. Due diligence should be employed to ensure the device is appropriately isolated from networks, people, and devices as soon as prudent after the examiner encounters the Mac.
6.2 Digital Forensics within the Mac Ecosystem
Examiners should be acutely aware that Macs are not inherently stand-alone computers. Apple products constantly communicate with other Macs, other Apple products, iCloud, the internet, and the user. As an example of the cohesiveness, if a user has an Apple Watch that is connected to the same iCloud account as a user’s MacBook Pro and iPad, then the user can walk up to the computer and configure it to automatically unlock the MacBook Pro and begin using the iPad as a second monitor without the user doing anything other than moving into proximity of the MacBook Pro. This relationship extends further than the immediate user to include all Apple products. If a user loses an Apple product, and it is connected to the Find My network, then the user can easily wipe the lost device remotely from the internet or another Apple product. The device does not need to be powered on, connected to a cellular network, or connected to the internet to receive a remote wipe (kill) signal. Further, the kill signal is carried through the Find My network (including Bluetooth) meaning that unrelated Apple products (including the examiners’ own devices) can transmit the kill code to the device.
Network and physical isolation of the Mac being acquired is imperative to ensure the data on the computer remains unchanged. Examiners should know that these computers are designed to network with other devices and should plan accordingly through the use of Faraday bags and boxes, network isolation, physical isolation, and timing. As will be discussed later, modern Macs never truly turn off using a feature called Power Nap. Even if the computer appears off, if a laptop lid is opened, a mouse is bumped, or a trackpad touched, that is enough to turn the Mac on.
Further, examiners must know the limits of their authority when imaging a Mac. Oftentimes documents that are not located directly on the Mac are actually located within iCloud with a pointer on the Mac to that cloud document. If the examiner clicks on the document, they may be exceeding the authority of their authorization because they could be accessing the document in the user’s iCloud storage location.
6.3 Types of Mac Computers and Computer Related Storage Devices
Apple is unique in that they create hardware, software and security modules that run directly on their products up through and including firmware, the macOS operating system, and the user programs/apps. This tight integration of software, hardware, and security creates an environment where architectural, technical, and security changes happen quickly and can often cause complications for the examiner.
Within Apple’s product line, Macs come in several physical form factors: laptops (MacBook Pro, MacBook Air), all-in-ones (iMac), towers (Mac Pro), and desktops (Mac Mini, Mac Studio). These physical form factors appeal to different users and have different performance standards. Despite multiple form factors, these computers conform to only three hardware architecture plans. The architecture type is more pertinent to their acquisition than other aspects. The architecture types include Intel-based Macs without the T2 security chip, Intel-based Macs with the T2 security chip, and Apple Silicon-based Macs with either the M1 or M2 processor. These three architecture types are each handled differently for acquisition purposes and will be treated individually throughout this paper.
From late 2012 to approximately November 2021, Apple has also created external and internal drives called Fusion Drives. These are now deprecated in favor of Solid State Drives (SSD); however, the examiner may encounter Fusion Drives. Fusion Drives are a combination of NAND Flash Storage and Hard Disk Drives (HDD) paired together logically. The paired drive is read by macOS as a singular drive. macOS moved those files the user accessed more frequently to the faster flash storage drive, providing the user with a faster experience. Those lesser used files were moved to the slower, larger HDD drive. When Fusion Drives entered production, NAND flash storage drives were relatively more expensive than they are today, and Apple attempted to bring them into mainstream use by combining them with a less expensive HDD. Within Finder, the user will see the two fusion drives as a singular drive. For forensic examiners however, most analysis software will treat these two drives as two independent disks. The forensic examiner should know about this limitation and compensate for it by either using a Mac or software that appropriately re-establishes the single Fusion Drive when processing the evidence.
Apple also allows users to format thumb drives and other external media with Apple’s Hierarchical File System (HFS+) or Apple File System (APFS), the two Apple file systems. For examination purposes, these items can be imaged like any other thumb drive and accessed via a Mac as read-only or through the use of forensic software that is capable of accessing these file systems. As noted below, a Disk Image File (DMG) of a thumb drive or external media mounted as read-only and locked can be viewed natively on a Mac without any additional software, which will give the examiner access to the Apple Extended Attributes contained within the drive without the use of third party software.
7. Training and Experience Consideration
8. Image Format and Metadata Considerations
When imaging a Mac, the examiner should think about how the evidence will be analyzed, used and shared. One preferred format for acquiring an image of a Mac is a DMG, a sparse image, or a sparse bundle file that is then locked, set to read-only, and hashed. These formats are Mac native, which allows the examiner to analyze the image natively on the examiner’s Mac computer. Third party developers often must reverse engineer tools to collect data from Macs because Apple’s proprietary and private nature prevents them from reading the data directly. Analyzing the files on the examiner’s Mac allows the examiner to leverage the various native Apple file system and operating system tools to analyze files and metadata.
Alternatively, the examiner may decide to use another forensic image format, such as .E01, .Ex01, AFF4, etc. Some tools allow for AFF4, .E01, and .Ex01 images on both Intel and Silicon Macs; however, the examiner needs to evaluate what, if any, Apple Extended Attributes could be lost if analyzing the data on non-Apple native platforms and tools. Examiners should ensure the forensic tools they use have the ability to read and process the Apple Extended Attributes that Apple’s APFS, HFS+ file systems maintain for each file.
When utilizing a Mac for a forensic examination system, if a file is copied to an external storage media, the media must be formatted as APFS or HFS+ to ensure the extended attributes file information is retained.
8.1 Firmware Password
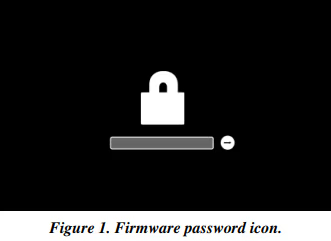
Occasionally, an examiner may encounter a Mac with a firmware password turned on. A firmware password prevents the user from booting past the firmware password and further protects the computer from firmware changes. This means the Mac cannot be started/booted from any internal or external storage device without the firmware password. Therefore, to forensically image a Mac with a firmware password, the easiest path is to obtain the password from the user. Examiners should know this password can be different from the user’s administrative password or any other macOS password.
Apple currently has the ability to remove a firmware password on a Mac; an examiner can seek legal process to compel Apple to do so. In Macs with upgradable RAM, a procedure is in place to remove the firmware password by removing the RAM, resetting the NVRAM, and following a set of steps1. Once complete, the firmware password will be removed. Examiners will know a firmware password is present because immediately upon boot they will encounter this icon:
8.2 Encryption
Apple has moved towards increasingly secure architectures across their product lines. Modern Macs implement potentially three layers of encryption: hardware (T2 chip), software (“FileVault”), and file system (“APFS”). FileVault and APFS can be activated individually or concurrently by the user. Hardware encryption is always on or off depending on the hardware architecture present on the target computer (Non-T2 Intel-based systems are unencrypted, while Intel-based T2 and Apple Silicon-based Macs are hardware encrypted). Further, because Macs operate within the Apple ecosystem, much of the data shared between the products by way of Apple’s iCloud is potentially encrypted as well. Starting with macOS version 13.1, Apple offered their Advanced Data Protection product which encrypts the users iCloud data with end-to-end encryption. If Advanced Data Protection is enabled by the user, only the user’s trusted devices retain access to the encryption keys used to decrypt iCloud data.2 The examiner should understand the encryption methodology that could be encountered to ensure their forensic image will be accessible after imaging is complete.
For hardware encryption, Apple Mac systems with the Intel-based processor produced between 2018 to 2020 will have a separate Apple T2 security chip. Apple Macs produced since late 2020 will have the new Apple Silicon processors that have the T2 security functionality embedded in the processor which Apple calls System on Chip (SoC). Apple’s SoC architecture has been in place for several years in the iPhone line, then subsequently in the Apple Watch line. Apple’s Apple Platform Security Document dated May 20223 goes into detail to describe their current security architecture on iPhones, Apple Watches, and Apple Silicon Macs. This document could be helpful to examiners in light of encryption.
8.2.1 Apple Mac with FileVault
Mac computers offer a built-in encryption solution called FileVault to encrypt data at rest. The current version of FileVault can encrypt full volumes on internal and removable storage devices. Examiners may encounter the following scenarios based on hardware/software encryption.
| Scenario | Result |
|---|---|
|
Apple Mac (prior to T2) with FileVault turned ON |
The internal SSD/HDD will be encrypted when the device is powered down and will require the user’s passphrase (i.e. password) for decryption. |
|
Apple Mac (prior to T2) with FileVault turned OFF |
The internal SSD/HDD will not be encrypted unless an alternate encryption tool was used. |
|
Apple Mac with T2 chip with FileVault turned ON |
The internal SSD drive will be encrypted and utilizes both the unique identifier from the T2 chip and the passphrase the user selected when FileVault was turned on. |
|
Apple Mac with T2 chip with FileVault turned OFF |
The internal SSD drive will be encrypted even with FileVault turned off. See section below for more detail. |
|
Apple Mac with Apple Silicon and FileVault turned ON |
The internal SSD drive will be encrypted and utilizes both the unique identifier from the Apple Silicon chip and the passphrase the user selected when FileVault was turned on. |
|
Apple Mac with Apple Silicon and FileVault turn OFF |
The internal SSD drive will be encrypted even with FileVault turned off. See section below for more detail. |
8.2.2 Apple Mac with Apple Silicon or T2 Security Chip
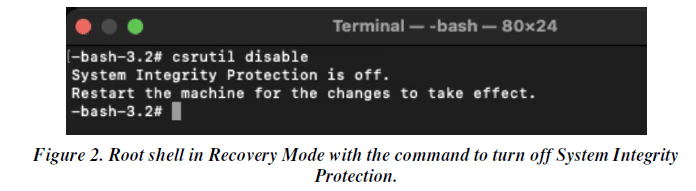
For Macs with Apple Silicon processors or the dedicated T2 security chip, data on the built-in SSD drive is encrypted by default by an AES engine and utilizes a 256-bit key which is tied to a unique identifier in the Apple Silicon or T2 module. This encryption occurs regardless if the user has enabled FileVault. When a user enables FileVault on a Mac with Apple Silicon or T2 chip, the user selects a passphrase. Then, to decrypt the data, it requires the unique identifier from the Apple Silicon or T2 module and the passphrase. Booting into a Mac with hardware security is handled differently between the two technologies. An Intel Mac with T2 hardware security will generally not boot from external media unless the examiner lowers the Secure Boot Security level in the Startup Security Utility found in the macOS Recovery Utilities menu.
The examiner may also need to turn off System Integrity Protection (“SIP”) in macOS Recovery to successfully boot from external media. See the screenshot below showing the root shell in Recovery Mode with the command to turn off System Integrity Protection:
Apple Silicon Macs will not boot from external media unless that media is signed by Apple. Several vendors have created bootable products which have been appropriately signed and acquisitions can be taken using these products. Others may require the examiner to lower security settings. To reduce the security settings, hold the power key on boot until the Startup Options window appears, select Options, then go to the Startup Security Utility. Apple wrote a document to show users and examiners how to change the security settings on the startup disk on a Silicon Mac.4
8.2.3 Additional Encryption Considerations
Apple gives its users power to encrypt data at rest and in transit. In addition to the system-wide methods listed above, the user can encrypt keychains, individual files, directories, notes, Disk Images (.DMGs created much like virtual hard drives in the Windows world), etc. and nest these objects within themselves using different passwords for each level. When an examiner interviews the user, they should specifically request all passwords and passphrases used on the system.
As noted below, the examiner may encounter BitLocker encryption on an Intel Mac when it is Boot Camped with Windows. Boot Camp is a hypervisor that allows the Mac to run a complete Microsoft Windows Operating System on its own partition on the Mac hard drive. The software creates an NTFS partition separate from the HFS+/APFS partition used by the Mac. These partitions should be treated as two independent computers for imaging purposes. It is possible to encrypt the Apple volumes with FileVault and have no encryption on the Boot Camp partition. They may be captured in the same image, but to process them the examiner will need to know an administrator password for the Mac and potentially the BitLocker password to decrypt each partition.
Without an administrator’s password for macOS and any passwords used, acquiring an image of a Mac computer may be impossible.
8.3 Boot Camp and Virtualization
Intel Macs have the ability to use Boot Camp to run a full Windows environment on their Mac hardware. Boot Camp is limited to Intel Macs and cannot be run on Apple Silicon Macs. As noted immediately above, Boot Camp partitions the hard drive into two distinct volumes, one for macOS and one for Windows. The Apple volume operates just like any other Apple hard drive. The Windows volume runs like any Windows computer, including the use of NTFS formatting, BitLocker, etc. Examiners should be aware that each partition can be encrypted using the respective proprietary encryption methodology and the examiner will need both the BitLocker password and the macOS password to complete a thorough examination. When Boot Camp is present on an Intel Mac, the examiner should treat this Mac as two independent computers. If FileVault is active on the Apple volumes, that does not necessarily mean that the Boot Camp Windows partition is encrypted. Examiners should test each partition to determine if encryption is active and handle each accordingly. To choose which partition to boot into, hold the option key when powering up the Mac. This is the same key used to boot into external bootable media. Once the menu comes up, the examiner is able to choose which partition to boot.
Additionally, all Macs have the ability to virtualize additional computers on them. Boot Camp cannot run on Silicon Macs, making virtualization the only way to run instances of Microsoft Windows on the hardware. Microsoft has officially endorsed Parallels as their official choice to run Windows on Apple’s ARM architecture.5 Examiners should be aware that virtualization is currently the only method to run a Windows computer on Apple Silicon Mac hardware and should take appropriate precautions to capture the virtual drive files for those virtual machines. Examiners should also obtain the appropriate administrative passwords for any virtual machines located on the machine.
8.4 Boot Loader Restrictions
Oftentimes examiners should boot into an external boot disk in order to image a computer. When an examiner needs to boot into a boot disk on an Intel-based T2 Mac or an Apple Silicon Mac they may need to disable secure boot and enable boot from external media as noted above. These settings can be changed in System Settings (formerly, Preferences).
Further, testing has noted that System Integrity Protection may block booting into certain third party tools. Examiners can test if SIP is active by typing “csrutil status” into a terminal window. The following response will be provided:

If the target computer continually boots to the OS, the examiner should consider turning off SIP in the Mac Recovery Mode Utilities Menu.
9. Triage
Examiners may need to preview the contents of a target computer prior to acquisition to reduce the amount of data acquired, avoid acquiring irrelevant information, or comply with restrictions on search authority. Triage typically includes reviewing the attributes and contents of potential data to be acquired, by automated or manual means, to determine its relevance to the investigation. There may be multiple iterations of this process, depending on the complexity of the investigation.
Examiners may decide to acquire a potential data source, in whole or in part, based on the result of the triage process. The focused collection of respondent or relevant data is an acceptable practice; refer to SWGDE Focused Collection and Examination of Digital Evidence [7]. Examiners should use forensically sound processes to conduct triage to the extent possible. Examiners should document the triage process in sufficient detail to allow its repetition and account for artifacts created by the triage process.
Although not a comprehensive list of actions to be taken, examiners may want to consider destructive processes and software, network connections, and multiple desktops in their preliminary triage. To start, the examiner can see most active programs and destructive programs by opening the force quit menu. This menu can be accessed by simultaneously pressing the command + option + escape keys. When pressed the following menu appears:
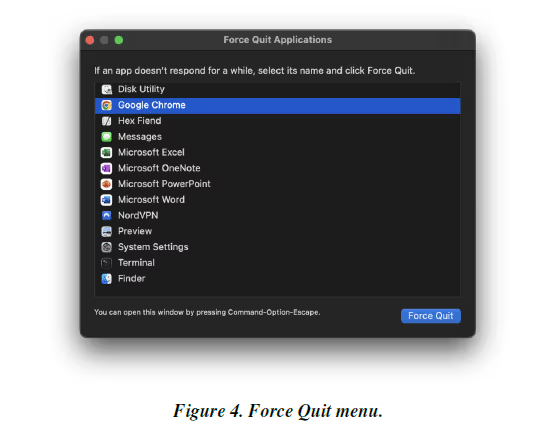
The Force Quit menu gives examiners a good idea of what applications are running on the system and will help them see if destructive programs are present.
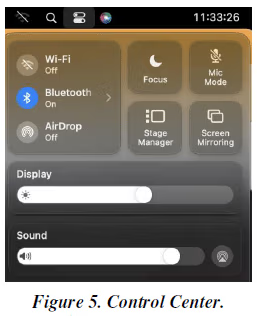
Examiners can see the network connections on the right side of the Menu Bar (the menu bar is at top of screen) under Control Center. The control center icon is a pair of vertically stacked slider bars slid in opposite directions. See screenshot below of the network section of the Control Center shows examiners what connections are active.
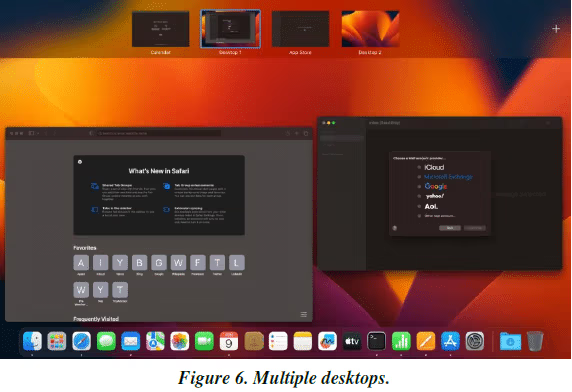
Lastly, an examiner can see multiple desktops using the Mission Control app or using the trackpad to swipe up with three fingers. To access Mission Control, hold the Command Key then press the spacebar. Type Mission Control then click on the app. It will immediately scatter all the active windows, so each window is seen individually. It will also show a ribbon at the top with multiple desktops. The examiner can then click on the desktop they want to view. The examiner may also use the trackpad to see all active desktops. In that case, the examiner can swipe up with three fingers to see the ribbon or they can use the trackpad to swipe left or right with three fingers to access the other desktops directly. The screenshot below shows multiple desktops:
10. Pre-interaction intelligence
As soon as the examiner touches the Mac it has the potential to change forensic evidence. Much like a cell phone, examiners should seek to obtain as much intelligence as possible about the computer prior to physically opening the lid of the device, touching keys, etc.
Most Mac’s list their model numbers near the regulatory markings on the bottom of the computer. The model numbers begin with a capital A followed by 4 digits, e.g. A2442 refers to a 14” MacBook Pro. Examiners may also use the EMC Number located on the bottom of the case6 to identify the specific Mac. Examiners should use this model number combined with good open source intelligence techniques to discover as much as possible about the target computer prior to interacting with it. Websites like Everymac’s Universal Lookup provide good detail to assist the examiner with the acquisition. Everymac’s website is: https://everymac.com/ultimate-maclookup/
11. Start-up Commands
After conducting solid research, Examiners should use startup commands to interact with the computer prior to booting into the operating system. Absent logical acquisitions from directly within the operating system, nearly all other acquisitions will be obtained via the Start-up Commands listed below. The examiner should be ready to engage the start-up commands immediately upon touching the Mac due to the computer’s propensity to activate quickly.
Common Mac startup commands are listed in the table below and at Apple’s startup command website: https://support.apple.com/en-us/HT201255. The following key combinations are firmware coded and engaged booting into the operating system which protects the integrity of the subject data. To activate these key combinations, hold the combination then press the power button until the screen shows the desired effect.
| Startup Key Combination | Result |
|---|---|
|
Command (⌘)-R |
Boot to the macOS Recovery System. This system will allow the user to reinstall macOS, deactivate System Integrity Protection (SIP), access DiskUtility, etc. |
|
Option-Command-R or Shift-Option-Command-R |
The system will boot macOS Internet Recovery window which will allow the user
to reinstall macOS. |
|
Option (⌥) or Alt |
Allows the user to choose the startup disk. (Only on Intel Macs) |
|
Option-Command-P-R |
Reset the NVRAM or PRAM depending on
the age of the Intel or prior Mac. (Only
appropriate for Intel and earlier Macs) |
|
Shift (⇧) |
Boot to safe mode. |
|
D |
Start up in the Apple Diagnostics Utility. |
|
N |
Boot from a NetBoot Server. |
|
Command-S |
Start in Single-User mode in macOS 10.14 and earlier. Single-User mode is a command line root shell that puts the drive in read-only mode. This mode allows the examiner to interact with the drive in a limited fashion. (No longer available on M1/M2 Macs) |
|
T |
Boot to Target Disk Mode – treats the subject
computer as an external hard drive when
connected to an Examiner’s machine. (Only
available on Intel Macs) |
|
Command-V |
Boots to Verbose mode which allows the Examiner to see a command line that shows real-time operating system activities. Originally used to debug problematic apps and drivers, examiners can use it to see what happens when the system boots. (This feature is no longer available after macOS 11.2 and later.) |
|
Eject, Mouse button, or trackpad button |
Eject removable media. |
|
Hold Power Button – M1/M2 Apple Silicon
Only |
Enter Startup Options. (Apple Silicon Only) |
12. Acquisition Process
This guide is a standard set of practices that will guide the examiner when attempting to acquire a forensic image or live acquisition of a Mac. It is not an all inclusive list, and nothing will replace the training and experience of the examiner. SWGDE highly recommends taking the necessary training to become proficient in Mac digital forensics. It is further assumed that examiners will use proper write blockers and data protection techniques to ensure a forensically sound examination has been conducted. After the target computer has been isolated from both people and outside electronic interference (network isolation) and the use of appropriate writeblocking technology has been employed, the examiner should proceed to the steps outlined below. A graphical flowchart similar to the practices listed below can be found at https://sumuri.com/mac-imaging-guide/.
12.1 Need to Allow Full-Disk Access
12.2 Step 1: Obtain and Test the Administrator’s Password
With increasing frequency, an administrator’s password is required to acquire a modern Mac. At the time of this writing, the only time an examiner will likely not need an administrator’s password is when imaging a non-T2 Intel Mac which does not have FileVault activated. At points during the acquisition process, the examiner will need the password to pass through the hardware encryption, software encryption, or both. The examiner will be unable to continue if either of these encryption methods is employed on the target system and the examiner has not obtained the password from the administrator. If however, the examiner comes upon a live, unlocked computer, the examiner may still be able to obtain a limited live acquisition of the target computer. Follow the steps below for additional information. When appropriate, the examiner may wish to test the administrative password prior to exiting a live machine. The examiner may choose to use either the command line or the GUI. To use the command line, hold the command button and press the spacebar. Type in “terminal”. In the terminal type the following command: “sudo fdesetup status”. Enter the administrator’s password. Terminal will respond by either presenting the FileVault status or with “Sorry, try again.” if the password is incorrect. To test the password graphically, go to Settings/System Preferences, Passwords, then type the administrator’s password. See screenshot immediately below:

SWGDE strongly cautions the examiner not to frivolously enter passwords. After 10 attempts, the Mac begins to protect itself.7 Apple describes excessive attempts on the website as an attempt…
To help prevent malware from causing permanent data loss by trying to attack the user’s password, these limits [on the number of passwords entered] aren’t enforced after the user has successfully logged in to the Mac, but they are reimposed after reboot. If the 10 attempts are exhausted, 10 more attempts are available after booting into recoveryOS. And if those are also exhausted, then 10 additional attempts are available for each FileVault recovery mechanism (iCloud recovery, FileVault recovery key, and institutional key), for a maximum of 30 additional attempts. After those additional attempts are exhausted, the Secure Enclave no longer processes any requests to decrypt the volume or verify the password, and the data on the drive becomes unrecoverable.
12.3 Step 2: Identification of Apple System
As noted earlier, pre-interaction intelligence is an integral step in the imaging process. It is imperative that the examiner identify the specific Apple Mac system to be acquired prior to acquiring any evidence. The location of the Apple Mac model number and serial number8 is dependent on the system (i.e., Mac Air, Mac Pro, Mac Mini, iMac, etc.). The Apple website https://support.apple.com/en-us/HT204308 provides information on how to find the serial number. The acquisition process is dependent on the type of Apple hardware. Subsequent to 2006 and prior to 2020, Apple Macs used Intel processors.
Starting in late 2017, Intel Macs began shipping with the T2 security chip. Starting in November 2020, Macs were produced with the new Apple Silicon processors (“Apple Silicon”). The current Apple Silicon processor models are called M1 and M2.
Once the model and serial number is obtained, the examiner may need to research various online resources to obtain additional information about the hardware. One such online resource to look up a serial number is https://everymac.com/ultimate-mac-lookup/.
12.4 Step 3: Isolate the Device
Macs are inherently networked via the Find My network whether powered on or off. Since macOS 10.13, Macs have had a feature called Power Nap which in the most recent iteration allows the operating system to update messages in Mail, update calendar events, update iCloud events when on shut-down and on battery power. Power Nap also allows the computer to download software updates and perform Time Machine backups when plugged in and shut down. Further, they and other Apple products have WiFi, Bluetooth, Near Field Communication, and in instances, cellular connections. Some of these connections can bring a kill signal to the device even when it is shut down. Examiners should be aware of this risk and take actions to isolate the device from all networks, devices, and people. Siri is Apple’s voice assistant, and it can be used to trigger scripts which can lock devices, delete artifacts, and complete other actions. Isolating the device both physically and electronically is an important part of acquiring the device in a forensically sound manner. From this point forward, the examiner should use Faraday bags and boxes to protect all Apple products seized on scene from outside electrical interference. Even when transporting the device, if it happens to pass a WiFi network it previously signed onto and it signs on again, the device could be wiped. This applies as much to Mac computers as it does to iOS devices.
12.5 Step 4: State of Mac Upon Arrival and Imaging Methods
12.5.1 Scenario 1: Mac is powered off (i.e. black screen)
12.5.2 Scenario 2: Mac displays logon screen
If the Mac displays the logon screen upon approaching the computer, the examiner may want to test the administrator password to a) validate that the administrator password works, and b) gain access to the desktop and immediately triage the computer. The examiner can then perform logical acquisition of volatile data and immediately identifiable relevant information. Then the system should be powered off and a physical image/logical acquisition of the disk should be obtained depending on the type of hardware.
12.5.3 Scenario 3: Mac displays desktop screen
Upon approaching the Mac, if the desktop screen appears, meaning the examiner has immediate access to the system, the user has enabled automatic logon (which means FileVault is turned off) or the system has not locked. The examiner should adjust power and lock screen settings to ensure they do not get locked out prior to completing the initial triage. The power and lock adjustments can be made in Settings. The examiner may want to logically acquire relevant volatile information and immediately identifiable relevant information. Before the system is powered off the examiner should test the administrator’s password. Then the system should be powered off and a physical image of the disk should be obtained if it is an Intel Mac or logically acquire the disk if it is an Apple Silicon Mac.
12.6 Step 5: Consider Additional Methods of Imaging
Intel Macs in particular have an additional way the examiner can image them. Silicon Macs have a less desirable, but similar method. Those methods are described below.
12.6.1 Target Disk Mode
Intel-based Macs have the ability to boot into Target Disk Mode9 which effectively turns the Target computer into an external hard drive which the examiner can then image from their own forensic Mac. This feature is only available on Intel Macs. To access Target Disk Mode on the Target computer, hold the T button upon booting into the computer. The examiner will then see a Thunderbolt icon on the screen. Use a Thunderbolt cable and hardware write blocker to attach the Target computer to the examiner’s imaging Mac. Once connected, the examiner’s Mac workstation will request the password for the target Mac. Enter the Target’s administrative password into the dialogue box and the Target computer is then mounted onto the examiner’s workstation. The examiner can then use imaging tools to take an image of the subject’s computer.
12.6.2 Share Disk Mode
Silicon Macs have Share Disk Mode10. Unfortunately, this method is slower than Target Disk Mode because of throttling and is not conducive to forensically imaging an entire target drive. Examiners may use this feature to conduct a targeted investigation to obtain specific files, but it is too slow and unstable to handle a full disk acquisition. Apple lists the steps to activate Share Disk Mode on their website.11
12.7 Step 6: Image File Options
With Macs, the examiner has an immediate choice to make when dealing with forensic evidence. The examiner can choose to process the data on a Mac or on a PC. Data should be acquired to either raw format or a well-documented, widely utilized forensic container. A raw image is a flat, uncompressed image file which necessitates storing metadata and integrity information separately. Forensic container formats can also store metadata and integrity information about acquired data and may support compression of the acquired data. Use of a raw image or widely utilized forensic container format prevents examinations of the acquired data from being dependent on a single tool, vendor, or method of analysis, and helps ensure archived data will be readable well into the future. – Taken from the 2022 SWGDE Best Practices for Computer Forensic Acquisition.
The file formats available for imaging a Mac are the Apple native Disk Images (DMG), sparse images, and sparse bundles and the following forensic formats: Expert Witness Format files (.E01 and .Ex01) and Advanced Forensic File Format (AFF4). When processing the image on a Mac, the preferred forensic image is a DMG, sparse image, or sparse bundle. DMG’s are flat images and inherently understood by Mac computers. It is quite possible for an examiner to conduct a full, forensically sound examination of a Mac on an examining Mac with only the Mac native tools and open source software. Use of commercially available forensic software is also an option. Because Mac’s understand DMG’s natively, the examiner should not be concerned with missing metadata or adding additional software layers to read the data. They do, however, should be concerned with conducting a forensically sound examination that can stand in court. DMGs can also be imported into analysis software on a PC and analyzed there, but the examiner should be aware of the limitations of their software to ensure they know what metadata could be lost in the transition between the target Mac and the analyzing PC.
The second widely used file image is an .E01. Depending on the analysis software employed by the examiner, the examiner could choose to create an .E01 image of the Mac, but only if the target Mac is an Intel based computer. .E01s cannot be created on Silicon Macs due to the ARM and SoC architecture. E01s can be mounted on a Mac through the use of macFUSE. macFUSE gives the Mac the ability to extend the “macOS native file handling capabilities via third-party file systems.”12 However, the process adds additional layers of software complexity some of which can be avoided by using native DMGs. Additionally, .E01s can be used on a wide variety of analysis software and are generally more portable than DMGs.
The guiding principle for computer forensic acquisitions is to minimize, to the fullest extent possible, changes to the source data. This is usually accomplished by the use of a hardware write-blocking device, software configuration, or an application intended to allow reading data from a storage device without allowing changes (writes) to be made to it.
The examiner should weigh the goals of the anticipated examination against the results of different acquisition methods and make sound decisions accordingly. No field guide can replace the training and experience of an experienced digital forensic specialist.
13. Logical Acquisition Considerations
At points it may be beneficial for the examiner to obtain logical acquisitions prior to shutting down the computer. Examiners should attempt to preserve as much metadata as possible when logically copying data off of the subject machine, keeping in mind that Apple Extended Attributes only exists on Apple native file systems. The following three artifacts may be useful in an examination:
13.1 Time Machine Backups
Time Machine is an Apple native backup utility that provides daily, weekly, and monthly backups of the subject computer. These backups can be encrypted or unencrypted and as noted above examiners should request passwords, including Time Machine Backup passwords from the administrator. These backups can be restored or mounted as read-only using both an examination machine or forensic software to obtain forensic artifacts from the Time Machine Backup. Examiners should discuss Time Machine Backups with target computer administrators while on site. Examiners should also look for evidence of Time Machine Backups within system preferences, in the menu bar, and physically around the examination site.
13.2 Local Snapshots
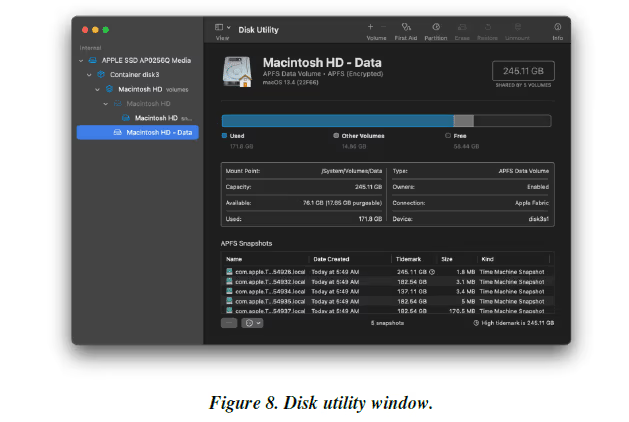
Local snapshots are used to backup macOS before it is connected to a Time Machine Backup drive. Local snapshots are kept for 24 hours or whenever the operating system needs more storage space, whichever is first. Examiners have the ability to mount these snapshots, view them in Finder, or take them off of the Mac for forensic investigation. To see if Local Snapshots are present, open Disk Utility, click on the Macintosh HD – Data Drive and look for APFS Snapshots at the bottom of the page. See the screenshots below:
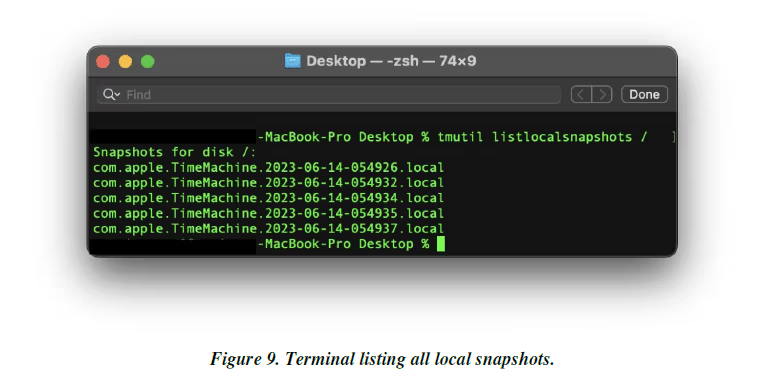
Alternatively, the examiner could open Terminal and type “tmutil listlocalsnapshots /” without the quotes. The trailing forward slash is important because it points the listlocalsnapshots command at the root directory and forces the computer to search the root directly for all snapshots. Terminal will then list all local snapshots which can then be mounted and examined as outlined above.
13.3 Keychains
Keychain is the password management system built into every Mac, iPhone, and iPad. A Keychain can contain passwords, private keys, certificates, and secure notes. Certain acquisition platforms allow for the acquisition of the Keychain as a separate file, providing the examiner with keys and passwords for devices, files, and account access. If possible, examiners should endeavor to acquire the keychain file for use in decrypting / unlocking devices and files and accessing accounts, within the scope of the search authority. Keychains can be encrypted with a separate password and at times made portable. Examiners should ask the administrator for Keychain passwords in addition to any other passwords requested.
14. Documentation and Safe Handling of Digital Evidence.
Other SWGDE Documents discuss the need to conduct good note-taking and documentation, safe handling of digital evidence, and other pertinent information. Those documents are incorporated here by reference. Documentation and a solid digital forensic methodology is irreplaceable and a vital aspect of any digital examination. An examination of a Mac computer is no different in that respect.
15. References
[1] Scientific Working Group on Digital Evidence and Scientific Working Group on Imaging Technology, “SWGDE/SWGIT Guidelines & Recommendations for Training in Digital & Multimedia Evidence”. [Online]. https://v8g6l3d3148.c.updraftclone.com/documents
[2] Scientific Working Group on Digital Evidence, “SWGDE Capture of Live Systems”. [Online]. https://v8g6l3d3148.c.updraftclone.com/documents
[3] Scientific Working Group on Digital Evidence, “SWGDE Best Practices for Digital Evidence Collection,” Public Draft. [Online]. https://v8g6l3d3148.c.updraftclone.com/documents/draft-released-for-comment/
[4] Scientific Working Group on Digital Evidence, “SWGDE Best Practices for the Acquisition of Data from Novel Digital Devices”. [Online]. https://v8g6l3d3148.c.updraftclone.com/documents
[5] Scientific Working Group on Digital Evidence, “SWGDE Recommended Guidelines for Validation Testing,”. [Online]. https://v8g6l3d3148.c.updraftclone.com/documents
[6] National Institute of Standards and Technology (NIST), “Computer Forensics Tool Testing Handbook,” Computer Forensics Tool Testing Program, August 6 2015. [Online]. https://www.cftt.nist.gov/CFTT-Booklet-08112015.pdf
[7] Scientific Working Group on Digital Evidence, “SWGDE Focused Collection and Examination of Digital Evidence”. [Online]. https://v8g6l3d3148.c.updraftclone.com/documents
[8] Scientific Working Group on Digital Evidence, “SWGDE Best Practices for Archiving Digital and Multimedia Evidence,” Proposed Document, TBD.
16. Additional Resources
Booting UEFI imaged media with/without GPT using VMWare – http://justaskweg.com/?p=1093
Forensic Analysis of GPT disks and GUID partition tables – http://www.digitalforensics.ch/nikkel09.pdf
UEFI and the TPM: Building a foundation for platform trust – http://resources.infosecinstitute.com/uefi-and-tpm/
UEFI and secure boot in depth – http://www.zdnet.com/uefi-and-secure-boot-in-depth-7000012138/
UEFI Firmware – http://technet.microsoft.com/en-US/library/hh824898.aspx
Boot Windows PE in UEFI or legacy BIOS mode – http://technet.microsoft.com/enus/library/dn293283.aspx
Install Windows PE to Run from a Drive (Flat Boot or Non-RAM) – http://technet.microsoft.com/en-us/library/hh825045.aspx
Scientific Working Group on Digital Evidence, “SWGDE Best Practices for Digital Evidence Collections”, [Online]. https://drive.google.com/file/d/1ScBeRvYikHvu6qtE_Lj3JtbOl94a5FDr/view
Scientific Working Group on Digital Evidence, “SWGDE Best Practices for Computer Forensic Acquisitions”, [Online]. https://drive.google.com/file/d/1ScBeRvYikHvu6qtE_Lj3JtbOl94a5FDr/view
History
| Revision | Issue Date | History |
|---|---|---|
|
DRAFT 1.0 |
6/14/2023 |
Initial draft created. |
|
DRAFT 1.0 |
9/21/2023 |
Draft released for public comment. |
|
1.0 |
1/11/2024 |
Final publication. |
|
1.0 |
3/5/2024 |
SWGDE voted to approve as Final Approved Document. Formatted for release as a Final Approved Document. |
6 https://everymac.com/mac-identification/where-to-find-apple-emc-numbers-for-mac-identification.html
8 Apple registration number and Apple hardware product serial numbers will never have the letter “O”.
9 https://support.apple.com/guide/mac-help/transfer-files-mac-computers-target-disk-mode-mchlp1443/mac
Version: 1.0 (3/15/2024)